ADDING TRANSITIONS TO YOUR MOVIE (for Premiere, scroll down):
ADDING TRANSITIONS USING iMOVIE:
With your project open in the timeline, click Settings in the upper-right corner of the timeline, and then select the “Automatic content” checkbox.
If you have applied a theme to your movie, iMovie inserts standard cross-disolve transitions between clips, with occasional transitions based on the theme. Not every space between clips gets a transition.
iMovie also adds a theme-styled opening title over the first clip and an end title over the last.
To include only standard, non-themed transitions in your movie, click the Theme button, select No Theme, click Change, and then deselect the “Automatic content” checkbox.
NOTE: If you already have a theme applied to your movie and select No Theme, all theme elements are removed from the movie.
To add transitions manually, you must first turn off automatic transitions.
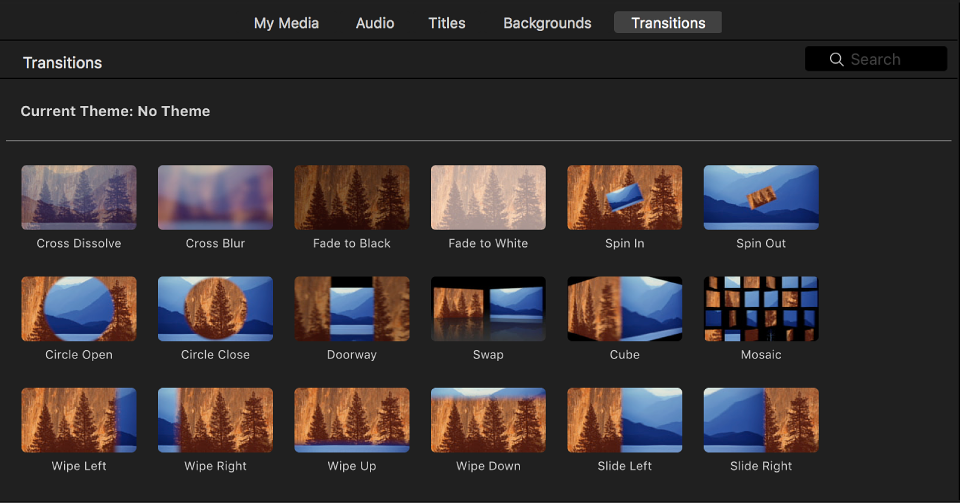
With your movie open in the timeline, select Transitions above the browser.
To preview a transition, skim it.
Do one of the following:
Add a transition between two clips: Drag a transition between two clips in the timeline.
Add a transition to both ends of a clip: Select a clip in the timeline, then double-click a transition in the browser.
A transition icon
 appears between the clips.
To add a cross-dissolve transition, in which the first shot fades
out while the second shot fades in, you must first turn off automatic
transitions.
In the timeline, click the edge of either clip you want to connect with a cross-dissolve.
Choose Edit > Add Cross Dissolve (or press Command-T).
A cross-dissolve transition appears between the two clips in the timeline.
Note: If you select a clip in the timeline and choose Edit > Add Cross Dissolve, a cross-dissolve is added to both sides of the clip.
By default, iMovie makes all the transitions in your movie the same length. Standard transitions are one-half of a second long, and theme-styled transitions (which are available only if you’ve applied a theme to your movie) are 2 seconds long. You can change the default duration in iMovie preferences. This setting is applied to transitions you add manually in any of your movie projects.
Choose iMovie > Preferences.
Double-click the number in the Transitions field and type a number of seconds.
Note: If your default transition duration is longer than is allowed by the available media in adjacent clips in your movie, the longest possible duration is used instead.
ADDING TRANSITIONS USING PREMIERE:
Transition effects blend the contents between two sequence clips over time, to smooth out an edit or add visual interest.
Transition effects use the unused parts at the start or end of a clip, called handles, to overlap the content for the duration of the effect.
If more than one clip is selected in the Timeline, or if you lasso multiple edits while holding down Command (macOS) or Control (Windows), you can apply the default transition to every selected edit.
CHOOSE A TRANSITION EFFECT:
Browse for transition effects in the Effects panel.Use the Search box in the Effects panel.
APPLY A TRANSITION EFFECT:
You can apply a transition effect to the beginning of a clip, to the end of a clip, or between two clips.
Drag a transition effect onto the end of a clip in a sequence or between two clips.RIGHT-CLICK TO APPLY THE DEFAULT TRANSITION:
Right-click the end of a clip in a sequence or a selected edit, and choose Apply Default Transitions.USE A KEYBOARD SHORTCUT:
If more than one clip or edit is selected, you can use a keyboard shortcut to apply the default transition effect.
Press Command+D (macOS) or Control+D (Windows) to apply the default video transition.Press Shift+Command+D (macOS) or Shift+Control+D (Windows) to apply the default audio transition.
Press Shift+D (macOS) or Shift+D (Windows) to apply the default video transitions. This shortcut automatically adds video or audio transitions.
SET THE DEFAULT TRANSITION EFFECT:
In the Effects panel, right-click a transition effect and choose Set Selected As Default Transition.REMOVE A TRANSITION EFFECT:
Select an effect in a sequence, and press Delete (macOS) or Backspace (Windows).TIP: It’s easy to overuse transition effects and distract the viewer. If a transition is too distracting, try using a cross dissolve or stick with a regular cut.
Comments
Post a Comment